Sunday, 8 February 2015

Create and Post General Ledger Journal

static void createGLJournal(Args _args)
{
    AxLedgerJournalTable journalTable; // class
    AxLedgerJournalTrans journalTrans; // class

    container acctPattern;
    container offSetAcctPattern;

    MainAccountNum                      mainAccount;
    MainAccountNum                      OffmainAccount ;

    LedgerJournalTable ledgerJournalTable; // table
    ledgerJournalCheckPost ledgerJournalCheckPost;// table

    LedgerAccountContract               ledgerAccountContract,OffledgerAccountContract;     //ModifiedBy
    str                                 costcenter,department,assetcode,customer,description;
    DimensionAttributeValueContract     attributeValueContract;
    DimensionStorage                    DimensionStorage;

    Amount                              amountCurDebit,amountCurCredit;

    mainAccount = "110110"; //IntegPostingProf.RentalRevenue;//
    OffmainAccount  =  "USA OPER"; //401100 IntegPostingProf.Revenue;


    /*costcenter = dimensionMappingRg.DimValue;//  Creating dimension for OffsetAcc
    department = dimensionMappingBr.DimValue;
    assetcode  = RentalRevenueStagingTable.AssetCode;
    customer   = RentalRevenueStagingTable.AccountNum;//
    ;
    */


    journalTable = new AxLedgerJournalTable();
    journalTrans = new AxLedgerJournalTrans();


    //Journal Name


    journalTable.parmJournalName("GenJrn");
    journalTable.save();


    journalTrans.parmJournalNum(journalTable.ledgerJournalTable().JournalNum);
    journalTrans.parmTransDate(systemDateGet());
    journalTrans.parmCurrencyCode("USD");
    journalTrans.parmAmountCurDebit(1200);
    journalTrans.parmAccountType(LedgerJournalACType::Vend);


                    journalTrans.parmJournalNum(journalTable.ledgerJournalTable().JournalNum);//

                      //AccountNum
                    ledgerAccountContract = new LedgerAccountContract();
                    ledgerAccountContract.parmValues(new List(Types::Class));


                    ledgerAccountContract.parmMainAccount(mainAccount);
                    if (department)
                    {
                        attributeValueContract = new DimensionAttributeValueContract();
                        attributeValueContract.parmName("@SYS850");
                        attributeValueContract.parmValue(department);

                        ledgerAccountContract.parmValues().addEnd(attributeValueContract);
                    }
                    if (costcenter)
                    {
                        attributeValueContract = new DimensionAttributeValueContract();
                        attributeValueContract.parmName("@SYS343410");
                        attributeValueContract.parmValue(costcenter);

                        ledgerAccountContract.parmValues().addEnd(attributeValueContract);
                    }
                    if (assetcode)
                    {
                        attributeValueContract = new DimensionAttributeValueContract();
                        attributeValueContract.parmName("@SYS343374");
                        attributeValueContract.parmValue(assetcode);

                        ledgerAccountContract.parmValues().addEnd(attributeValueContract);
                    }
                    if (customer)
                    {
                        attributeValueContract = new DimensionAttributeValueContract();
                        attributeValueContract.parmName("Customer");
                        attributeValueContract.parmValue(customer);

                        ledgerAccountContract.parmValues().addEnd(attributeValueContract);
                    }

                    dimensionStorage = DimensionServiceProvider::buildDimensionStorageForLedgerAccount(ledgerAccountContract);//

                    journalTrans.parmLedgerDimension(dimensionStorage.save());
                    //-------------------------------------


                    //OffsetAccount
                    OffledgerAccountContract = new LedgerAccountContract();
                    OffledgerAccountContract.parmValues(new List(Types::Class));


                    OffledgerAccountContract.parmMainAccount(OffmainAccount);

                    if (department)
                    {
                        attributeValueContract = new DimensionAttributeValueContract();
                        attributeValueContract.parmName("@SYS850");
                        attributeValueContract.parmValue(department);

                        OffledgerAccountContract.parmValues().addEnd(attributeValueContract);
                    }
                    if (costcenter)
                    {
                        attributeValueContract = new DimensionAttributeValueContract();
                        attributeValueContract.parmName("@SYS343410");
                        attributeValueContract.parmValue(costcenter);

                        OffledgerAccountContract.parmValues().addEnd(attributeValueContract);
                    }
                    if (assetcode)
                    {
                        attributeValueContract = new DimensionAttributeValueContract();
                        attributeValueContract.parmName("@SYS343374");
                        attributeValueContract.parmValue(assetcode);

                        OffledgerAccountContract.parmValues().addEnd(attributeValueContract);
                    }
                    if (customer)
                    {
                        attributeValueContract = new DimensionAttributeValueContract();
                        attributeValueContract.parmName("Customer");
                        attributeValueContract.parmValue(customer);

                        OffledgerAccountContract.parmValues().addEnd(attributeValueContract);
                    }

                    //dimensionStorage = DimensionServiceProvider::(OffledgerAccountContract);
                    journalTrans.parmOffsetAccountType(LedgerJournalACType::Bank);
                    journalTrans.parmOffsetLedgerDimension(dimensionStorage.save());

                     journalTrans.save();


    /*
    journalTrans.parmOffsetAccountType(LedgerJournalACType:: Ledger );
    //journalTrans.parmOffsetLedgerDimension( = "401100";
    offSetAcctPattern = ["401100-Disp","401100", 0];//,"BusinessUnit", "10", "Department","800","CostCenter", "07","CustomerGroup","10" ];
    journalTrans.parmOffsetLedgerDimension(AxdDimensionUtil::getLedgerAccountId(offSetAcctPattern));

    journalTrans.save(); */

    info(strFmt("Journal %1 created", journalTable.ledgerJournalTable().JournalNum));
    /*ledgerJournalCheckPost = ledgerJournalCheckPost::newLedgerJournalTable(journalTable.ledgerJournalTable(),NoYes::Yes);
    ledgerJournalCheckPost.run();
    info(strFmt("Journal No. %1.", journalTable.ledgerJournalTable().JournalNum)); */
}

Tuesday, 6 January 2015

Tracing with Menu Tool

Tracing and logging are useful ways to monitor the system. They can help diagnose both errors and performance problems.
To set the tracing options, click the Tools menu, click Options, and then click the SQL link. You can configure the following SQL tracing areas:
·         Multiple SQL statements
·         Long queries
·         Warnings
·         Deadlocks
Microsoft Dynamics AX tracing tools monitor or diagnose the state of the system.
Tracing tools are provided for development and testing, and to monitor client/server traffic in production environments.
To enable tracing for development:
·         Click Tools > Options, and then click the SQL tab. A check box on the top of the tab makes it easy to enable or disable a complete set of trace settings. After this box is selected, all other options on the form are made available.


Four different kinds of traces can be set up: Multiple SQL statements, Long queries, Warnings, and Deadlocks.
The Long queries trace is not enabled until a positive value is entered in the Threshold field. The unit of measure is milliseconds.
Traces can be directed to four output media:
·         Message window: Used for quick and instant display. This is typically used for simple tracing during development.
·         Infolog: Enables information to be accumulated and provides an interface to the SQL Diagnostics tools.
·         Table (database): Used to store large amounts of trace information. If you select this option, trace data is written to the SysTraceTableSQL table, and can be viewed in the SQL statement trace log form.
·         Write to file: Used to store large amounts of trace information.


The tracing system in Microsoft Dynamics AX is based on the kernel supplying information to application elements, which in turn handle dispatching and storing the information. Business partners can extend or change the behavior of the trace-engine. To investigate how to extend the default trace mechanism, check the method SysTrace on the Application class, which is called once for each trace event.

Monday, 5 January 2015

Reporting Framework In Ax

Reporting Framework Terminologies
As you all know, the reports in AX 2012 have moved to SSRS reporting, so MS has introduced a robust reporting framework wrapping over the basic SSRS reporting functionality. There are many terms used in reporting framework in AX that I will try and explain here:
  • Report Definition Language: RDL is an XML application primarily used with Microsoft SQL Server Reporting Services. RDL is usually written using Visual Studio. AX has Report Definition Language Contract classes that can generate and build the RDL for an AX SSRS report. This contract provides a weakly typed representation of parameters. It contains methods that can be used to get or set values. It also contains a map of parameter names and the SrsReportParameter class. The base class is SrsReportRdlDataContract.

  • Report Data Provider (RDP): A framework that helps in building, processing and rendering data to reports. Most of the reports require RDP classes that help in implementing business logic required to process data and provide data in readable, presentable and required formats design. The base class is SrsReportDataProvider. This class has two main sub classes, SrsReportDataProvderBase andSrsReportDataProviderPreProcess. We will discuss about these classes in future posts.

  • Report Data Contracts: The Report Data Contracts framework is used to provide and manage the parameters to an SSRS report. The report data contract contains all the other relevant instances like Report Data Provider contracts, print contracts, RDL contracts and query contracts that will be used by a report.

  • Printing Contracts: The framework that manages report printing (to different mediums). The base class is SrsPrintDestinationSettings. There are other supporting contracts that are used for printing, we will discuss about them in future posts.

  • Query Contracts: This framework manages the queries used to process report data. This framework is also responsible for providing dynamic filters (similar to our ‘Select” buttons on report dialogs that open the Query specification form to filter data on report queries).

  • Report Controllers: Report controllers control the report execution and dialog forms. Report controllers can be used to modify report dialogs, validate report parameters and other validations necessary before report execution. The base class is SrsReportRunController. Reports utilizing report controllers can only be used for printing data on client side. Reports controlled by controllers cannot be used in Enterprise Portals.

  • Report UI Builders: UI Builders are used to modify the report dialogs at run-time or to add additional parameters and write custom business logic to report dialogs. Ex: You want to perform some task based on data modified for one parameter, that affects other parameters or build a custom lookup etc (something that was provided by RunBaseReport framework class in previous versions. The base class isSrsReportDataContractUIBuilder.
These are some of the basic reporting terminologies that you will be using extensively for reporting in AX.

Wednesday, 31 December 2014

Code Profiler

The Code Profiler measures the execution time of individual lines of code. Use this tool to find performance bottlenecks and to help understand code that was developed by others.

     How to use Code Profiler

Ø  Click Tools > Code profiler to open the Code Profiler tool.
Ø  Navigate to the functionality that you want to test. For example, navigate to the appropriate place in the Navigation Pane.
Ø  To limit the results displayed, check the Trace depth enabled check box, and then type the number of levels that you want to be displayed in the results.
Ø  Click Start. Use the functionality you want to test. When testing is complete, click Stop. The system now saves all logged data to the database. This might take quite some time because a database record is created for each executed line of code.
Ø  Write a description of your code profile in the Summary dialog.
Do not select the Calculate line total check box. If you need to calculate line totals later, use the Profile runs form.
Ø  Click OK.
The Profiler runs form opens. This enables you to view data collected by the profiler.

   To view the data that is collected by the code profiler

Ø  Click Profiler runs.
Ø  Select the data set that you want to view.
Ø  Click the Statistics tab to view a summary of the information for the code profile.
Ø  Click one of the following four buttons to view more detailed data:
Call tree – Shows you a hierarchy of method calls
Profile lines – Shows a list of all lines of code that are executed, making it easy to find which lines of code took the longest to execute.
Traverse – Shows a sorted list of the time that was spent in all methods, combined with the sum of the time spent in sub calls, plus the sum of the time spent in the method, depending on the origin of the call.
Totals – Allows you to select summaries of the time spent in lines, methods, and objects.

    The Call treeProfile lines, and Traverse forms show raw data. Aggregated data is available in                            the Totals options.

  Using code Profiler in X++

As an alternative to the graphical user interface, you can control the code profiler directly from your X++ code. For this purpose there are two macros:
·         #Profilebegin()
·         #ProfileEnd
These two macros have to be in the same level in a method.


static void codeProfilerTest()
{
    int   i, j;
    ;  
    #profileBegin("test")  
    
    for(i=1;   i<=10; i++)
    {  
        j+=   i*i;
    }  
    
    info(strfmt("%1",j));  
    #profileEnd  
}

You will then have to find the collected data under Tools > Code profiler > Profiler runs, and process the data yourself by selecting Totals > Calculate sum.


Saturday, 20 December 2014

Ax & TFS Daily Development Version Control

To check new objects into TFS:

  1. If the object exists and you have not modified the object, modify it first.  If the object is a completely custom object, create it first.
By default objects do not exist in version control.  For example, objects that exist only in the sys and syp layers would not be checked into TFS because they can be recreated simply by reinstalling AX.  Version control is for tracking changes to customizations made to existing objects or for completely custom objects.
  1. In the AOT right-click on the object and choose Add to Version Control
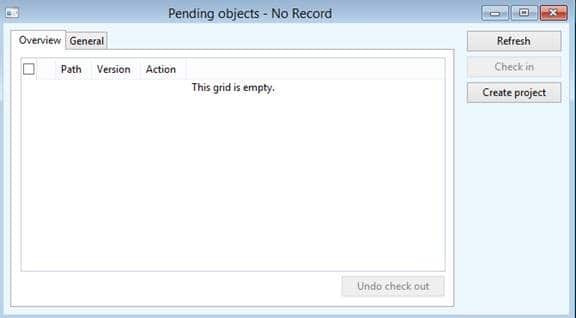
  2. Once you have a collection of objects ready for check-in, in the AOT go to Version control > Pending Objects and check-in the objects in the list
-When objects are added to version control, xpos are created for the objects and saved into the local repository on the developer’s machine.
-When the objects are checked into version control, the xpos in the local repository are copied up to the central shared TFS repository.

PendingObjects

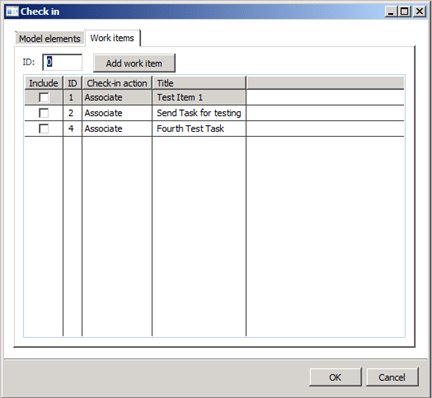
  1. In the form where you check in the objects there is a Work Items tab.
-Enter in the ID of the TFS task to tie this check-in to and in TFS’s Sharepoint site in this history for the task you’ll see your check-in against the task and you will see the individual objects that were checked-in.

CheckIN

To check out objects previously added to version control:

  1. In the AOT right-click on the object and choose Check Out
  2. Make your changes to the object
  3. Click on Version control > Pending Objects and check-in the objects in the list
-Once one developer has an object checked out, another developer will not be allowed to check out that same object

To view the history of an object:

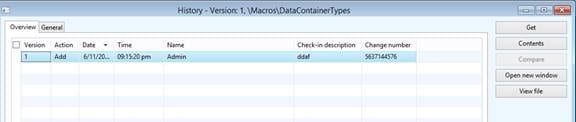
  1. Right-click on the object and choose History
  2. In the form that opens you can select a version from the list and click the Get button to import that version of the object into your AOT.
  3. In the form that opens you can click the View file button to open the xpo for a particular version of the file
History_Version1

To synchronize to changes checked into the central repository by yourself or other developers:

  1. Click on Version control > Synchronize
  2. In the dialog that opens mark the Force checkbox and click OK.
-This will force version control to overwrite any changes you’ve made to objects in your local AOT that aren’t checked out or under version
control.
  1. In the form that opens, mark the model you want to synchronize to.
-When you synchronize to the central repository all of the xpos that have been checked in since the last time a sync was executed on the machine, are copied from the central repository to the local repository.
-Once the xpos exist in the local repository they are imported into AX and a database synch and compile are performed for those imported objects.

To check out the label file and add new labels to it:

  1. Click on Tools > Labels > Label editor
  2. The label editor form will open and at the top click on the Get Latest button to ensure you have the latest copy of the label file.
  3. At the top of the label editor form click the check-out button to check out the label file.
  4. To create a new label, in the label editor form, click the New button and save the label.
  5. The label will be given a temporary label id like $@ABC123.  Use the temporary label id in your code that uses the label.
  6. Once the labels have been created, click Version control > Pending objects and check-in the objects in the list.  (The label file will be one of the objects.)
  7. When you check in the label file, a permanent label id will be assigned to each new label.
-If the code you have that uses those labels is still checked out or is being checked in with the label file, the temporary labels will be automatically replaced with the permanent label id.
-If the code you have that uses those labels is not checked out, after the label file is checked in and the permanent label ids are known, you’ll have to go through your code, check out the objects, and manually change the code to use the permanent label id.

Friday, 5 December 2014

Validates an email address

Validates an email Address

SysEmailDistributor Class
client server public static boolean validateEmail(str _email)

Run On  Called

Parameters  _email

Type: str Email address 

Return Value  Type: boolean

true if email address is valid. false otherwise. 
Example for Email Validation 
public static void sysemail(args _args)
{
   boolean isvalid;
  // Here change the email address and check
   isvalid=SysEmailDistributor::validateEmail("xyz@gmail.com");
 
  info(strFmt("%1",isValid));
}

Saturday, 29 November 2014

Compare Tool

The Compare tool enables you to compare:
·         Two different application objects.
·         The same application object in two different layers.
·         Two versions of the same application object, if you are using version control.
·         Two versions of the same application object and the original version of the application object.
·         Two SSRS report designs, in cumulative update 7 for Microsoft Dynamics AX 2012 R2.

To compare two application objects
  1. In the AOT, select the application objects that you want to compare.
  2. Right-click the selected application objects, and then click Compare. The Comparison form opens.
Option are Show differences only, Suppress whitespace, Case sensitive, Show line             numbers

  1. Click the Advanced tab, and then set the following options as needed.
  2. Click Compare to begin the comparison of the two application objects.

To compare versions of an object

1.     In the AOT, right-click an object, and then click History.
or
In the AOT, click the History button.
2.     Select the versions of the object to compare and then click Compare.
3.     Optionally click the Advanced tab and select advanced options.
4.     Click Compare.

To compare application object layers

1.     Click Tools > Code Upgrade > Compare layers. The Compare layers tool opens.
2.     In the Compare layers tool, set the following properties as required.
Options: Project name, Source layer, Reference layer, only include elements present in both layers
  1. Click OK to begin the application object layer compare.
  2. A project holding application objects that differ is now created. The objects are presented in a tree structure and the regular Application Object Tree (AOT) shortcut menu commands are available.